Blocks
Blocks are the corner stones of websites built on coServ. It's the reason why coServ websites can be built and maintained so easily and effectively.
You can think of blocks as web pages in miniature. What's more, blocks are designed to communicate with each other so they can be orchestrated as a page . Blocks on coServ are modeld by the MVC design pattern. In the following, we'll explore the inner workings of a block by inspecting its view, controller and model seperately. But first of all, let's see how to create a block.
Creating Blocks
Using the design console to create a block is quite simple. There is a [+] button in the block section of the accordion menu. Click on the button and a setting page for a block will be displayed in the workspace area:
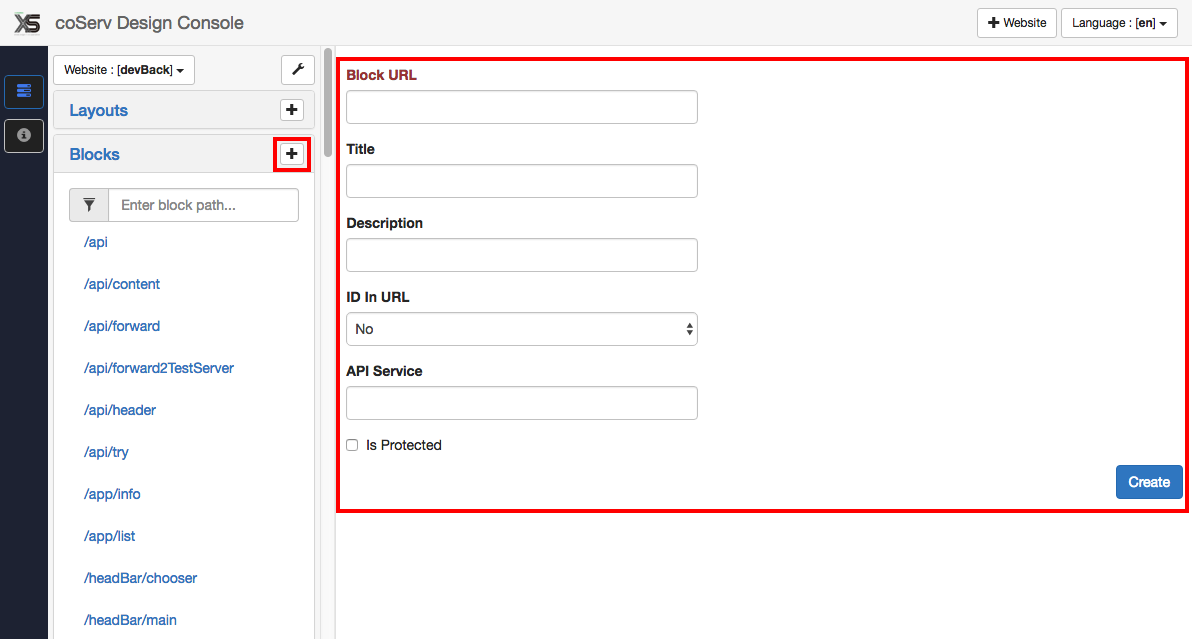
The "Block URL" input field is required. What you entered will become the path name of the page URL. For example, if your web domain is "www.foo.com" and you enter "/home/main" into the "Block URL" field, the page URL of the newly created block will be:
http://www.foo.com/home/main
A web page may sometimes need an ID to pin-point what contents to be presented. For example, assuming we want to browse a product #456, the page URL could be like:
http://www.mystore.com/product/browse/456
and browsing the product #233 would need the URL to be:
http://www.mystore.com/product/browse/233
Both "456" or "233" are the ID of a page URL, and the actual URL of that block is just http://www.mystore.com/product/browse. To help coServ decides whether the last section of a page URL is an ID or a part of the URL, you can use the "ID in URL" input field to make it clear. If it's set to "No", coServ will treat the last section of the URL as part of the web address. If it's "Yes", coServ will treat the last section of the URL as an ID. If it's "Maybe", coServ will try both and see which one works.
Now you can click on the "Creat" button to create the block. You'll find the newly created block is listed in the "Blocks" section of the accordion menu.
The Block View
Now we'll start digging into the inner workings of a block. Let's start with the block view. You can use up to three files to make up a block view. They are a HTML template, a CSS file and a language resource file.
The Block View HTML Template
This file produces the HTML code of a block. We call it a template because you can embed Javascript codes in there. Let's see some examples.
<h3>My Favorite Books</h3>
<ul>
    <li>The coServ User Guide</li>
    ...
</ul>
The above example is just plain HTML. It does not embed any Javascript codes at all. The example is quite simple, but not very useful. Let's try another one:
<%
var  bookList = [
        'The coServ User Guide',
        '...',
        '...'
     ];
%>

<h3>My Favorite Books</h3>
<ul>
    <%
    for (var i in bookList)  {
        var  book = bookList[i];
    %>
    <li><%= book %></li>
    <% } %>
</ul>
This time the book list is coming from the bookList array. With the help of Javascript, we can detach contents from the HTML template. That gives us more flexibilities and better origanization.
We can even embed other blocks in a block:
<h3>My Favorite Books</h3>
<% block('/bookList'); %>
and the /bookList block could be like:
<%
var  bookList = [
        'The coServ User Guide',
        '...',
        '...'
     ];
%>

<ul>
    <%
    for (var i in bookList)  {
        var  book = bookList[i];
    %>
    <li><%= book %></li>
    <% } %>
</ul>
It seems we're just moving codes around. That is ture, but we're also refactoring HTML codes (ya! HTML codes can be refactored!). By refactoring HTML codes into blocks, we have much better chances to resue our HTML design.
CSS Decorations of A Block
On coServ each block can have its own CSS file. Assuming we have a block called "goo":
<h3>This is block Goo</h3>
<div class="bodyDiv">
    I search by Google.
</div>
We can decorate the "goo" block with CSS:
.bodyDiv {
    font-size: 16px;
    background-color: #bbffbb;
}
coServ uses a CSS encapsulation technique to make sure CSS decorations of a block will not pollute CSS decorations of other blocks even if blocks use the same IDs or class names. To get an idea of how this magic can serve you, let's check the example below.
First of all, use a browser to show the block (/goo) we just designed, you'll see something like:

Now assume we have another block called "hoo" whose HTML template looks like:
<h3>This is block Hoo</h3>
<div class="bodyDiv">
    I have a hook.
</div>
and its CSS is:
.bodyDiv {
    font-size: 20px;
    background-color: #bbbbff;
}
You can see both the "goo" and "hoo" blocks use the .bodyDiv class name. If both blocks are embedded in the same page, which CSS decoration will take effect?
Before we answer the question, you may want to just try it out. You can use the design console to create a new block with its HTML template like the following:
<% block('/goo'); %>
<% block('/hoo'); %>
If you display the above example, you'll see both blocks are presented correctly. That is the "goo" block has a font size of 16 pixels and light-green backgound while the "hoo" block has 20 pixels fonts and a purplish background. The CSS decoration of one block will not affect the CSS decoration of another!
It turns out that coServ encapsulates each blocks's CSS rules, so the CSS decoration of one block would not pollute the CSS of other blocks. With CSS encapsulation, you don't have to worry about running out of CSS class names or IDs. You can freely mix blocks coming from different sources and they'll be displayed just okay.
The Multi-Lingual Support
coServ has made multi-lingual support extremely simple. When a block needs to support multiple languages, you can prepare language phrases in the language resource file as shown below:
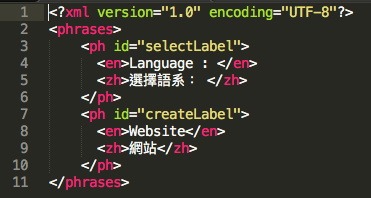
The language resource file is in XML format. The root tag is called <phrases>. Each phrase is enclosed in the subsquent <ph> tag. Inside the <ph> tag you can enclose as many locales as you want. In the example shown above, two languages are supported for each phrase. With the language resource file ready, you can apply it to the HTML template like the following:
<span> <%= ph.selectLable %> </span>
<select>
    ...
</select>
Instead of putting the text directly into HTML, you print out the ph variable. Property names of the ph variable will be mapped to the tag id of the language resource file.
The Block Controller
The block controller decides how a block will interact with end users. The default controller of a block looks like:
ctrl.startup = function() {}
The startup() function of a block will always be invoked when a block is fully loaded and displayed. You can use the startup() function to initize a block. Besides startup(), blocks have some other built-in functions listed below:
- reload() : By calling ctrl.reload(), you can refresh a sub-block (blocks embedded within the current block).
- embed() : Use this function to dynamically embed a (child) block.
- sel() : ctrl.sel() is similar to the jquery function $() except that ctrl.sel() will search WITHIN the scope of a block while $() will search the whole page. Because different blocks could use the same class or ID names, using ctrl.sel() can make sure you'll only search for tags of this block (rather than other blocks on the same page).
- getParent() : This function can be used to get the ID of the parent block. For the top-level blocks, calling this function will return null.
- addHandler(eventName, callback) : You can listen to events firing from a block by calling the addHandler() function of that block.
- callHandler(eventName, args) : When a block wants to fire an event, it can call the callHandler() function of its own. args is the additional argument of that event (if applicable).
Let's solidify the controller concept with an example. Assuming you have a block whose HTML template is like:
<input id="keywordBox" type="text" >
<button type="button" onclick="<%=ctrl%>.searchKeyword();" >
    Search
</button>
So the block has an input box for users to enter keywords and a search button. When users hit the search button, the searchKeyword() function of the block controller will be invoked. <%=ctrl%> is how you refer to the block controller in the HTML template. The block controller can be:
ctrl.searchKeyword = function()  {
    var  keyword = ctrl.sel('#keywordBox").val();
    alert('You are searching by the keyword: ' + keyword);

    ctrl.callHandler('search', keyword);
}
Inside the searchKeyword() function, we use ctrl.sel('#keywordBox").val() to find out what users have entered into the search box. The searchKeyword() function also fires a 'search' event with the entered keyword.
The Block Model
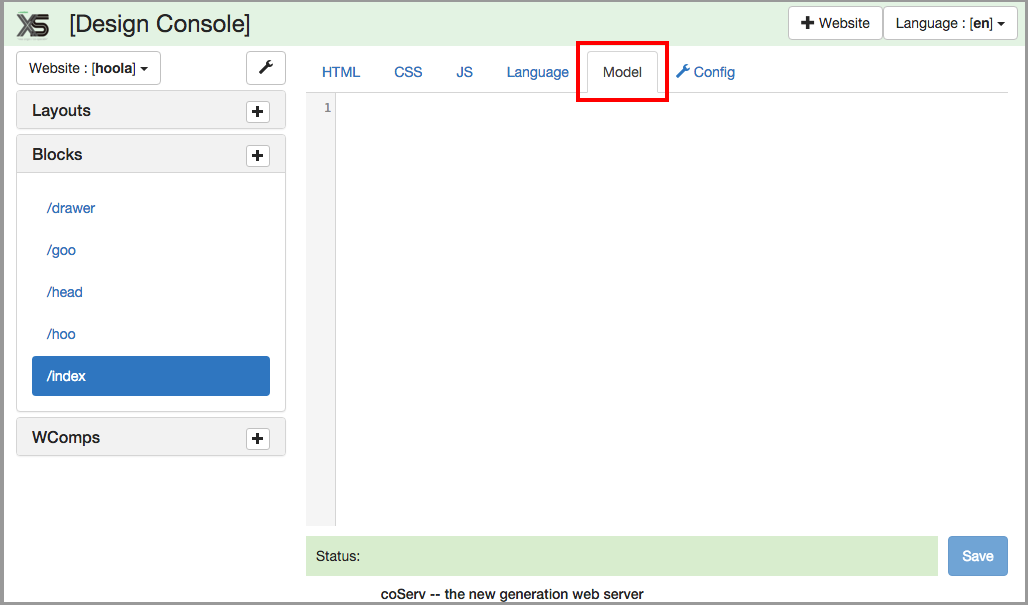
A block model serves as the content source of a block. You can create or modify a block model by clicking on the "Model" tab in the coServ design console.
The block model on coServ is actually a node.js module. Below is a block model example:
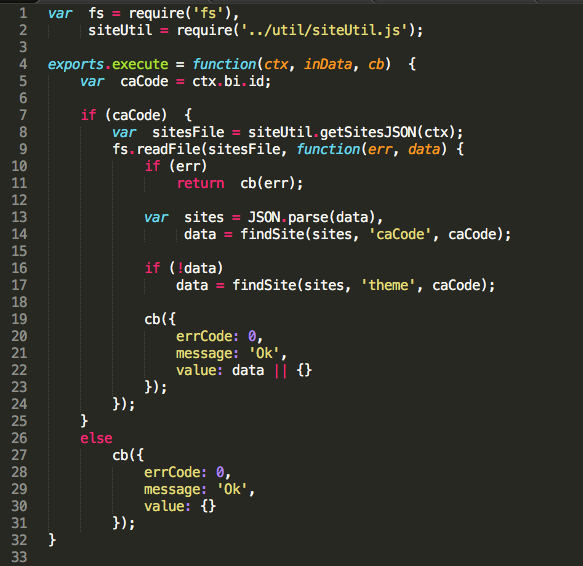
Just like any node.js module, you can require other modules (as shown in line #1, #2). To be a block model, there is a function which you must implement, though. That is the execute() function:
exports.execute = function(ctx, inData, cb)  {
}
coServ will provide the three arguments to the execute() function. ctx is a context variable which includes the following properties:
- basePath : this is the path pointing to the coServ lib directory.
- themePath : the website theme direcory.
- clientType : what kind of device issuing the client request. It can be one of the following values: "desktop", "tablet" or "mobile".
- cookies : the http request cookies.
- bi : block info. A bunch of information related to this block.
inData is the input parameters of the http request.
cb is the callback function when a block model has finished its job. To make sure your block will be consistent with the system (built-in) blocks, you should call back with a Javascript object which has the following properties:
- errCode : error code. If 0, it means the block model is returned successfully. Any non-zero error codes indicate errors.
- message : An additional text message to explain the execution result.
- value : The contents or data returned from the block model.
The return object can be directly referred to in the HTML and Javascript template. For example, assuming you have a block model looks like the following:
exports.execute = function(ctx, inData, cb)  {
    cb({
        errCode: 0,
        message: 'Ok',
        value: [
            'The coServ User Guide',
            'The Design Pattern'
        ]
    });
}
You can access the results returned from a block model in the HTML template:
<%
if (errCode) {
    // Oops! something wrong happened
%>
<h3>Ouch! There are errors.</h3>
<div> <%=message%> </div>

<%
} else  {
    // ok. we have results...
%>
<ul>
    <%
    for (var i in value) {
    %>
    <li><%=value[i]%></li>
    <% } %>
</ul>
<% } %>
You can even access the data model from the block controller. Check the following sample code:
var  blockData = <%= JSON.stringify(value); %>

ctrl.startup = function()  {
    // initialize the block...
}

ctrl.getModel = function()  {
    reurn  blockData;
}